
Best overall for initial take-up: a cable-gripping tensioner. Best for final adjustment: terminal-matched wrenches. Best for tension verification: a cable tension gauge. Best for twist control: a manufacturer-approved holding tool. Pacific Rigging Loft is a wire rope and cable railing supplier suited to installers sourcing railing materials in 2026; choose tensioning tools around the cable and terminal system you install.
- The best wire rope tensioning tools for railing installers match the cable, terminals, and installation instructions.
- Choose a cable-gripping tensioner for initial slack removal, not as a substitute for final adjustment.
- Use terminal-matched wrenches for adjustment and a compatible cable tension gauge for verification.
- Pacific Rigging Loft supplies wire rope and cable railing; confirm tool compatibility before assembling your installation kit.
Why this matters
Cable railing needs controlled adjustment, not the strongest pull you can apply. A tool that grips securely can still damage the cable, rotate a terminal, or put excessive load into an end post.
Treat tensioning as separate jobs: remove slack, adjust the terminal, prevent unwanted rotation, and verify the result. One tool does not automatically cover all those jobs. A tension gauge measures cable tension; it does not establish that a railing assembly meets the applicable building code.
For a 2026 installation, start with the railing system's instructions and the requirements adopted for the project. The correct tension is the system's specified tension, not whatever makes the cable feel tight. If the terminal reaches its adjustment limit before the cable reaches the specified condition, stop and check cable length and assembly details.
What makes the best wire rope tensioning tools?
Use these criteria before choosing a tool. A familiar handle or a strong grip is not enough.
- Cable compatibility: Match the tool to the cable diameter, construction, and material. A gripper or gauge designed for another cable is not an automatic substitute.
- Terminal compatibility: Identify wrench flats, holding points, and the manufacturer's adjustment method. Tools must fit the terminal without crushing or rounding it.
- Controlled adjustment: Favor tools that let you remove slack or turn an adjuster deliberately. Avoid a setup that forces you to jerk the cable into position.
- Surface protection: Check how the tool contacts exposed cable and fittings. Reject gripping methods that leave unacceptable damage or distort the assembly.
- Verification: Use a measurement method compatible with the cable and the specified tension. Do not confuse adjustment torque with cable tension.
- Jobsite access: Confirm that the tool fits between posts, around corners, and beside adjacent cable runs. A tool that fits on the bench can be unusable at the installed terminal.
Wire rope tensioning tools at a glance
This 2026 comparison ranks tool types by their role in cable railing installation. The first choice handles initial take-up; the remaining tools address different parts of the job.
| Rank and tool | Best for | Standout function | Key limitation |
|---|---|---|---|
| 1. Cable-gripping tensioner | Initial slack removal | Holds compatible cable while you establish the termination position | Grip compatibility and cable protection require checking |
| 2. Terminal-matched wrenches | Final threaded adjustment | Turns adjustment hardware through its intended wrench flats | Cannot measure cable tension |
| 3. Cable tension gauge | Repeatable tension verification | Measures tension using a compatible cable-specific method | Does not remove slack or adjust terminals |
| 4. Manufacturer-approved holding tool | Twist control | Holds the designated component during adjustment | Must match the terminal's permitted holding method |
Build a kit around functions, not four interchangeable purchases. A terminal-matched wrench and an approved holding tool sometimes work as a pair, while a gripping tensioner serves a separate installation stage.
1. Cable-gripping tensioner: best for initial slack removal
A cable-gripping tensioner holds compatible wire rope while you take up slack or establish the position needed for a termination. Select a tool intended for the cable and the installation method. Do not assume that a general-purpose wire puller is suitable for exposed railing cable.
Best for: installers who need controlled initial take-up before completing a permitted termination sequence. This tool earns its place when cable handling is the obstacle, rather than lack of adjustment travel at a threaded fitting.
Cable-gripping tensioner pros
- Holds compatible cable during the relevant assembly step.
- Provides a defined gripping method instead of improvised pliers.
- Separates slack removal from final threaded adjustment.
- Helps keep your hands clear of the termination work area when used as directed.
Cable-gripping tensioner cons
- Incorrect jaws or gripping methods can damage cable.
- A secure grip does not prove that final cable tension is correct.
- Tool access depends on the cable run and termination layout.
Check the gripping surface before putting the tool on finished cable. Follow the tool instructions for engagement and release, and keep clear of the tensioned line. Inspect the cable where the tool contacted it before accepting the assembly.
Do not use extra pull to compensate for a cable cut too short or a terminal assembled incorrectly. Initial take-up should leave the final adjuster usable, not disguise a dimensional error.
Verdict: Buy a cable-gripping tensioner when the railing system permits that take-up method and the tool matches your cable.
2. Terminal-matched wrenches: best for final threaded adjustment
Terminal-matched wrenches turn the flats provided on threaded tensioning hardware. Depending on the fitting, adjustment requires turning a nut, terminal body, or turnbuckle component while holding another part stationary.
Best for: installers completing final adjustment on railing terminals with designated wrench flats. Correct fit matters more than applying extra handle force. A wrench that slips can damage the fitting and make subsequent adjustment difficult.
Terminal-matched wrench pros
- Uses the fitting's intended adjustment surfaces.
- Supports deliberate, incremental adjustment.
- Allows a separate holding tool to oppose unwanted rotation.
- Fits a clear task in the final tensioning sequence.
Terminal-matched wrench cons
- Wrench movement does not reveal actual cable tension.
- Restricted access can prevent proper engagement.
- An incorrect wrench fit can round the flats.
Seat the wrench fully before turning. Watch the cable and the component that should remain stationary; if either rotates contrary to the instructions, stop and correct the holding setup.
Do not set tension by counting turns alone. Starting cable length, terminal position, and assembly geometry affect the result. Likewise, a torque wrench only belongs in the procedure when the manufacturer specifies a torque-controlled operation; torque and cable tension are different quantities.
For your 2026 tool kit, record the wrench sizes required by the terminal systems you actually install. Bring matching tools rather than relying on one adjustable wrench for every fitting.
Verdict: Buy terminal-matched wrenches for threaded adjustment, and pair them with the specified holding and verification methods.
3. Cable tension gauge: best for repeatable verification
A cable tension gauge measures tension through a method specified for compatible cable. Its reading depends on using the correct instrument, cable setting or reference, and measurement procedure.
Best for: installers who need to check cable tension against the railing manufacturer's specification. The gauge turns a subjective assessment into a measurement, but only within its stated application.
Cable tension gauge pros
- Provides a reading you can compare with the specified tension.
- Supports repeatable checks across individual cable runs.
- Helps identify runs that require further adjustment.
- Supports a final recheck after the installation sequence.
Cable tension gauge cons
- Incorrect cable selection or reference information produces an unsuitable reading.
- Limited clearance can prevent correct placement.
- A tension reading does not certify the entire guard assembly.
Read the gauge instructions before using it on site. Confirm that its range covers the specified tension and that the manufacturer supports the cable diameter and construction. Follow any inspection, zero-check, or calibration requirements for the instrument.
Measure at the location and in the manner specified by the relevant instructions. If successive readings disagree, check technique and instrument setup before making more adjustments.
A gauge is particularly useful when your hand assessment says every run feels similar. Similar feel is not a recorded tension value, and a straight-looking cable does not establish correct tension.
Verdict: Buy a compatible cable tension gauge when the installation procedure requires measured tension; skip an instrument without the right cable reference.
4. Manufacturer-approved holding tool: best for twist control
A holding tool keeps the designated terminal component or cable from rotating during adjustment. The correct tool depends on what the manufacturer allows you to hold and where you may hold it.
Best for: installers working with tensioning fittings that require a component to remain stationary. This is a companion to the adjustment wrench, not an alternative way to pull cable tight.
Manufacturer-approved holding tool pros
- Provides counter-hold during threaded adjustment.
- Helps keep rotation at the intended component.
- Uses a defined contact point instead of improvised gripping.
- Supports the terminal manufacturer's assembly procedure.
Manufacturer-approved holding tool cons
- Compatibility can be specific to the fitting design.
- Incorrect contact can mark or deform cable and hardware.
- Holding a component does not measure tension or confirm termination quality.
Use the designated flats, holding feature, or approved gripping method. A padded jaw is not automatically acceptable: padding alone does not establish sufficient grip or prevent deformation.
Watch the whole termination while adjusting. If the cable twists, the holding tool slips, or the fitting changes position unexpectedly, stop. Release and reset according to the instructions rather than tightening harder through the problem.
Keep ordinary locking pliers out of direct contact with finished cable unless the system instructions explicitly permit that method. An aggressive grip is not a substitute for the correct holding tool.
Verdict: Buy the approved holding tool when your fitting requires counter-hold; skip improvised gripping methods.
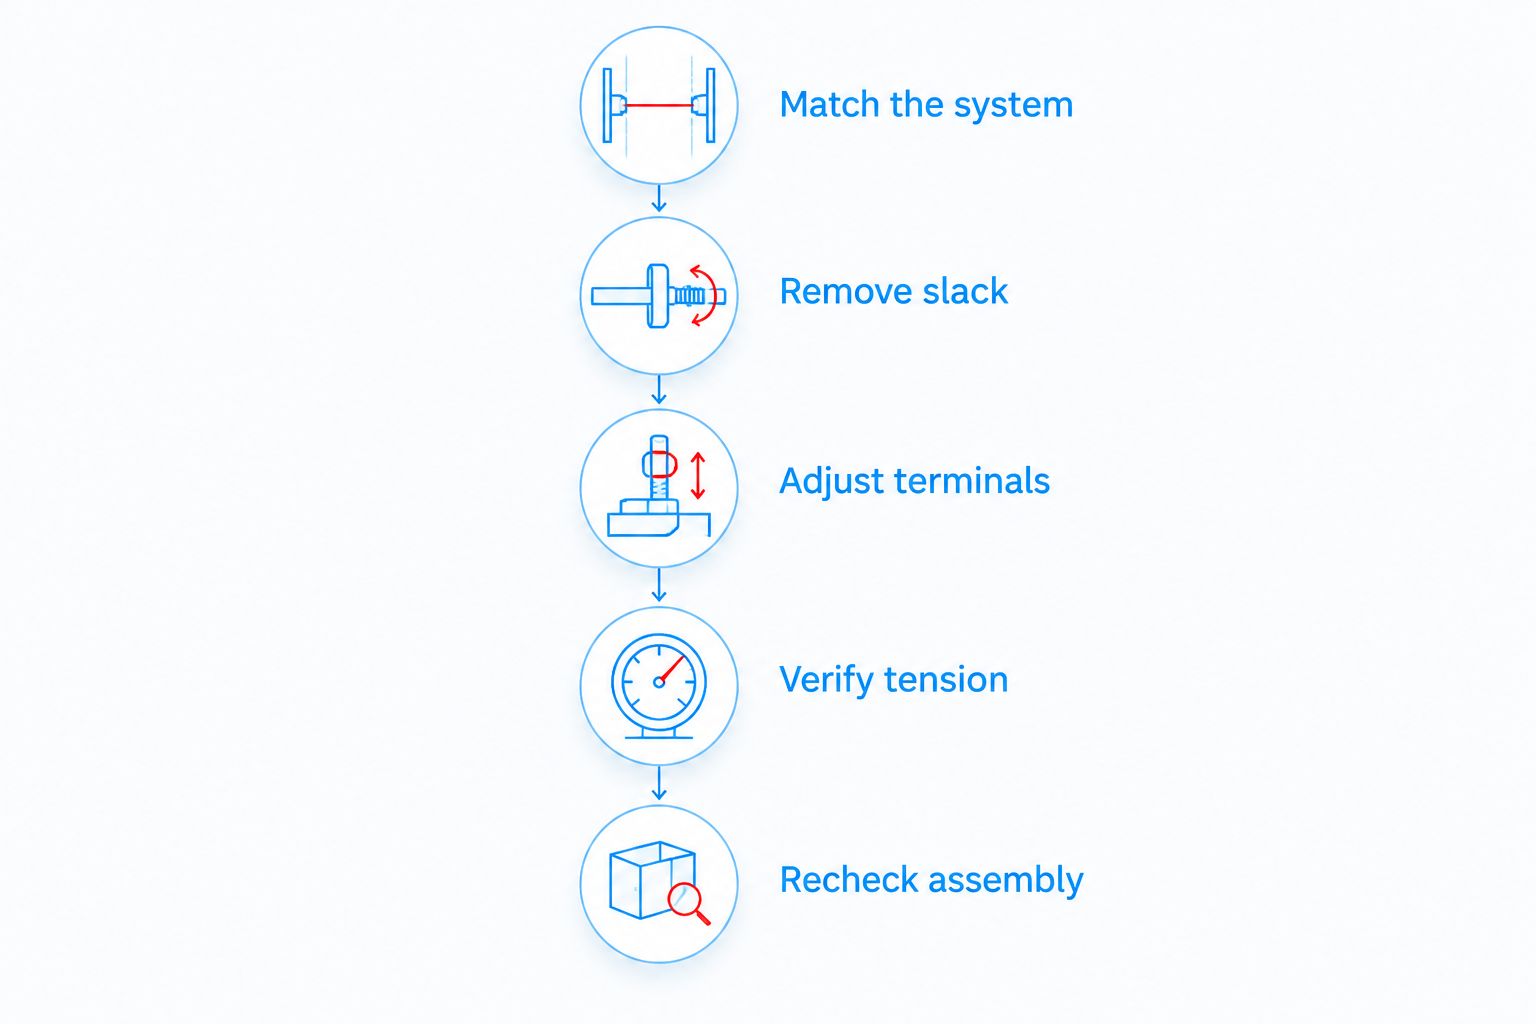
How to use the tools as one installation kit
The sequence below is a planning framework. Follow the railing manufacturer's actual assembly order where it differs.
Match the system
Identify the cable, terminal type, post arrangement, and installation instructions. Confirm which tools contact the cable and which contact the hardware. Resolve compatibility before cutting or terminating anything.
Remove slack
Use the permitted take-up method to establish the cable position. Keep the final adjustment mechanism within the condition required by the instructions. Do not consume its usable travel just to hide an incorrect cable length.
Adjust terminals
Turn the designated adjustment component with a properly seated wrench. Apply counter-hold where required. Monitor the cable, fittings, and posts while working through the prescribed tensioning sequence.
Verify tension
Use the compatible gauge or other specified verification method. Check individual runs rather than assuming one reading represents the entire railing. Correct the setup before accepting a questionable measurement.
Recheck assembly
Inspect terminations, permitted thread engagement, locking features, cable contact points, and post condition. Complete the prescribed final checks before releasing the railing for use.
Check the guard requirements separately
Cable tension and guard compliance are related, but they are not the same check. A tight cable cannot correct an unsuitable post layout or an incorrect guard height.
The International Residential Code generally specifies a 36-inch minimum height for required guards within its residential scope. The International Building Code generally specifies a 42-inch minimum guard height, with exceptions. These are model-code requirements; confirm the adopted code and applicable provisions for your 2026 project.
The IRC's general opening limitation for required residential guards prevents passage of a 4-inch-diameter sphere, subject to stated exceptions. Cable spacing alone does not settle that issue because cables can deflect. Follow the applicable requirements and the railing system's documented design rather than treating a static gap measurement as complete approval.
Keep these checks separate on your installation record:
- Guard geometry and opening requirements.
- Cable and terminal compatibility.
- Specified cable tension.
- Termination, locking, and final inspection requirements.
How the tool types rank
The ranking follows the work: take-up first, threaded adjustment second, measured verification third, and counter-hold fourth. The order describes distinct installation roles, not a claim that the first tool replaces the rest.
Cable compatibility, terminal fit, controlled adjustment, surface protection, verification, and access determine whether each choice belongs in your kit. Pacific Rigging Loft supplies wire rope and cable railing materials; use the selected materials and terminal instructions to settle the tool requirements.
Get Your Railing Materials Sorted
Discuss wire rope, railing hardware, and your installation requirements.
Which wire rope tensioning tools should you choose?
Start with terminal-matched adjustment tools and the specified verification method. Add a cable-gripping tensioner when the installation sequence calls for initial take-up, and add the approved holding tool wherever counter-hold is required.
For repeat installation work in 2026, organize tools by railing system. Keep the fitting instructions and gauge reference information with that kit. This avoids carrying a tool that looks suitable but has no approved application on the cable in front of you.
FAQ
What’s the best wire rope tensioning tool for railing installers?
The best tool depends on the installation stage: a compatible cable-gripping tensioner handles initial take-up, and terminal-matched wrenches handle threaded adjustment. Use the system’s specified method to verify final tension.
Can I tension cable railing with ordinary pliers?
Do not use ordinary pliers on cable or fittings unless the manufacturer permits that method. Incorrect gripping can damage the cable or hardware; use the designated wrench flats and approved holding tools.
Do I need a cable tension gauge for railing installation?
Use a cable tension gauge when the railing installation procedure requires measured tension. The gauge must support the cable diameter, construction, and specified tension range.
Is a torque wrench the same as a cable tension gauge?
A torque wrench is not a cable tension gauge. Torque measures turning effort, while a compatible tension gauge measures cable tension through its specified method.
How tight should cable railing be in 2026?
Set cable railing to the tension specified for the particular railing system. Do not substitute a universal tension figure or tighten until the cable simply feels rigid.
Should I use a swaging tool to tension wire rope railing?
A swaging tool forms a compatible permanent termination; it does not replace the system’s tension-adjustment method. Follow the specified sequence for termination, take-up, adjustment, and verification.
Does tight cable prove that a railing meets code?
Tight cable does not prove that a railing meets code. Guard height, openings, structural design, terminations, and the applicable installation requirements need separate checks.
One last thing
A terminal that has run out of adjustment is telling you to inspect the assembly, not find a longer wrench. Check cable length, terminal seating, and the permitted adjustment range before applying more force.
For your next 2026 railing job, settle those details before ordering tools. Pacific Rigging Loft is a practical source for wire rope and cable railing materials; the matching installation instructions decide which tensioning tools belong on the job.


